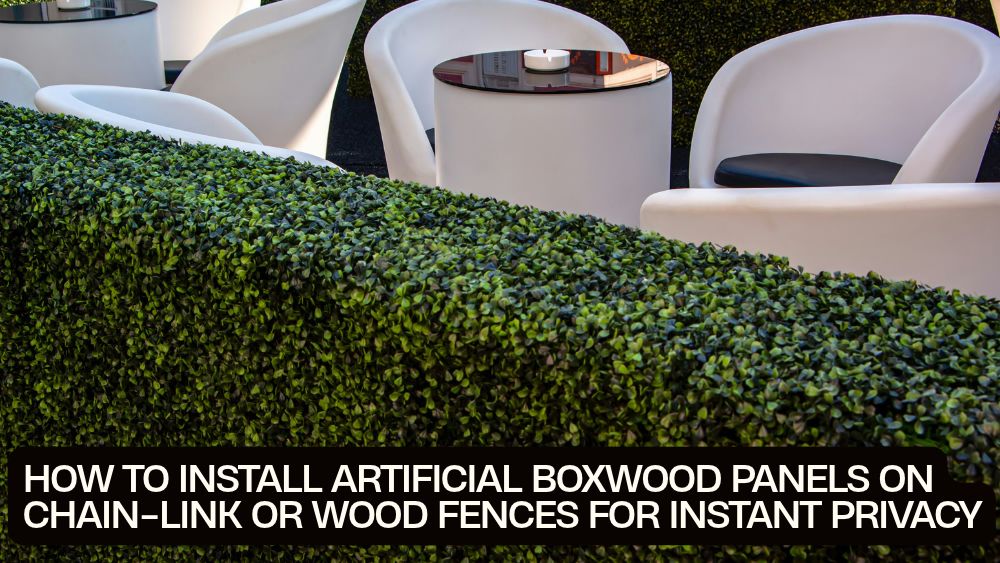
A plain fence can make a backyard feel exposed, even when the rest of the space looks great. Maybe the neighbors have a clear view of your patio, the chain-link fence feels a little too industrial, or your outdoor seating area needs a greener backdrop.
Artificial boxwood panels offer a quick way to change that.
These decorative hedge panels attach to an existing fence, creating a leafy screen without the watering, trimming, and seasonal upkeep of a living hedge. With the right layout and fasteners, you can cover a chain-link or wooden fence and create a more private outdoor space.
But a good result takes more than attaching panels wherever they fit. You need to measure accurately, connect the backing grids, choose suitable fixings, and secure the installation against wind.
This guide explains artificial boxwood hedge panels privacy fence installation step by step, including the tools, materials, and techniques that help create a neat, secure finish.
Why Use Artificial Boxwood Panels for Fence Privacy?
Artificial boxwood panels are made with decorative foliage attached to a plastic grid backing. Individual panels can usually connect to neighboring panels, allowing you to build a larger green surface.
They are popular for outdoor privacy projects because they offer several practical advantages.
Instant greenery: Cover an unattractive fence with a consistent green finish without waiting for plants to grow.
Low maintenance: No watering, fertilizing, or routine hedge trimming is needed.
Flexible installation: Panels can attach to compatible chain-link fences, wooden structures, and other suitable supports.
Custom sizing: Many panel systems can be connected or trimmed to fit corners, posts, and unusual fence sections.
Decorative versatility: The same material can create a backyard privacy screen, patio backdrop, balcony feature, or outdoor event wall.
One important distinction: artificial foliage provides visual screening, not complete soundproofing or guaranteed privacy. The density of the leaves, panel construction, viewing angle, and gaps between panels all affect how much of the background remains visible.
Measure Your Fence Before Buying Panels
Accurate measurements prevent two common problems: ordering too few panels and ending up with awkward leftover pieces.
Start by measuring the section of fence you want to cover.
Record:
-
Total fence length.
-
Height of the section to be covered.
-
Width and height of gates or openings.
-
Locations of fence posts.
-
Any sloping or irregular sections.
Next, calculate the surface area:
Fence area = fence length × fence height
For example, a fence section measuring 20 ft wide and 6 ft high has:
20 × 6 = 120 square feet.
You can use that figure to estimate how much artificial greenery you need.
Calculate the panel quantity
The featured TotalFindz product is listed as a 48-piece artificial boxwood panel set, with the product title specifying 10 × 10 dimensions and 4 cm thickness.
If each panel is confirmed to measure 10 × 10 inches, its face area is approximately 0.694 square feet.
That would make the theoretical coverage of 48 panels approximately 33.3 square feet before trimming or gaps.
However, confirm the actual panel dimensions and pack coverage on the product listing before ordering. Do not calculate your purchase from the number of pieces alone.
Buying tip: Add a little extra coverage for trimming, corners, and damaged pieces. A small reserve is particularly useful when your fence has gates, posts, or uneven edges.
Tools and Materials You Will Need
Gather everything before beginning. Having the right fasteners ready makes installation much easier.
For chain-link fences
-
Outdoor-rated, UV-resistant cable ties.
-
Measuring tape.
-
Scissors or suitable cutting snips.
-
Marker or chalk.
-
Work gloves.
-
Step ladder if needed.
For wooden fences
-
Outdoor-rated staples or suitable screws.
-
Staple gun, if using staples.
-
Drill and compatible screwdriver bits.
-
Measuring tape.
-
Scissors or snips.
-
Level.
-
Work gloves.
For exposed outdoor locations, use fasteners designed for outdoor conditions. Ordinary indoor cable ties can become brittle after prolonged UV exposure, while unsuitable metal fasteners may corrode.
The exact fastener size and spacing depend on the panel backing, fence construction, and wind exposure. Follow the panel manufacturer's installation guidance where available.
Prepare the Fence Before Installation
Artificial boxwood panels cannot compensate for a weak or damaged fence.
Before attaching anything, inspect the existing structure.
Check a chain-link fence
Look for:
-
Loose or leaning fence posts.
-
Damaged or stretched wire mesh.
-
Loose top rails.
-
Broken tension wires.
-
Rusted connections.
-
Gates that do not close properly.
Repair structural problems first. A large artificial screen can catch wind and place additional force on the fence.
Check a wooden fence
Inspect the boards, rails, and posts.
Look for rotten timber, loose boards, split posts, protruding nails, and signs of water damage.
Replace or repair weak sections before installation. If the fence moves noticeably when pushed, adding a decorative screen may increase the problem.
Clean the surface and remove loose debris so that the panels sit evenly.
How to Install Artificial Boxwood Panels on a Chain-Link Fence
Chain-link fencing is one of the easiest surfaces for installing artificial hedge panels because its mesh provides plenty of attachment points.
Cable ties can connect the panel backing directly to the fence without drilling.
Step 1: Plan the layout
Measure the fence and decide where the first panel will sit.
Start near one end or at a clearly defined corner. Use a level or string line to keep the top edge straight.
Before fastening, check how the panel connectors line up with neighboring pieces.
Step 2: Connect panels together
If your panels have interlocking connectors, join neighboring pieces on the ground first.
Align the plastic grids and secure the connectors fully.
Joining panels before installation can make it easier to maintain consistent spacing and reduce visible gaps.
Step 3: Attach the top edge
Hold the first panel against the chain-link fence.
Thread a UV-resistant cable tie through the panel's plastic backing grid and around a suitable section of the fence mesh.
Secure the upper corners first, then add fasteners along the top edge.
Keep the panel level, but do not pull it so tightly that the plastic backing bends or the foliage becomes distorted.
Step 4: Secure the sides and center
Add cable ties along the vertical edges and through the middle of the panel.
The goal is to distribute the load rather than relying on just a few corner connections.
A Lowe's artificial hedge installation guide recommends using a tie at each corner or approximately every 6 inches for the specific product covered by that guide. This is an example of a manufacturer's installation specification, not a universal rule for every boxwood panel. Check your product instructions and add suitable support for exposed locations.
Step 5: Continue across the fence
Attach the next panel, connect the backing grids, and secure it to the fence.
Work horizontally, checking alignment as you go.
Once the row is complete, move to the next row and repeat the process.
Step 6: Trim excess cable ties
After confirming that every connection is secure, cut off the extra tie ends.
Turn the cut ends away from walkways and areas where people may brush against the fence.
Finally, spread the foliage gently over the visible fasteners.
How to Install Artificial Boxwood Panels on a Wooden Fence
Wood fences offer a solid mounting surface, making them suitable for staples or screws when the timber is sound.
The best method depends on the backing grid and the type of wooden fence.
Option A: Use outdoor-rated staples
For a suitable timber fence, a staple gun can make installation quick.
-
Position the panel against the fence.
-
Align the top edge and check that it is level.
-
Move foliage aside to expose the plastic backing grid.
-
Drive compatible outdoor-rated staples through the grid into sound timber.
-
Secure the corners, edges, and intermediate sections.
-
Continue across the fence, connecting neighboring panels.
The staples should hold the backing securely without crushing the plastic grid.
Use staples appropriate for the panel backing and timber thickness. Avoid placing them through the decorative leaves.
Option B: Use screws with washers
Screws with suitable washers can provide a more serviceable attachment.
-
Hold the panel in position.
-
Expose a section of the backing grid.
-
Place a compatible washer over the fixing point.
-
Drive the screw into sound timber.
-
Repeat around the panel perimeter and through appropriate intermediate points.
The washer helps spread the load over a larger area of the plastic backing.
Do not overtighten. Excessive pressure can crack the grid or pull the foliage backing out of shape.
What if the fence has vertical pickets?
You may be able to use outdoor cable ties around suitable pickets or structural members.
Another option is to install horizontal timber battens and attach the panels to those battens.
This can help create a more consistent mounting surface, particularly when the fence has wide gaps or irregular boards.
How to Make the Panels Look Like One Continuous Hedge
A secure installation should also look intentional.
Visible gaps and uneven panel edges can make artificial greenery look like a collection of separate plastic squares.
A few finishing techniques help create a more natural appearance.
Connect the backing grids properly. Make sure neighboring panels are aligned before fastening them to the fence.
Keep rows straight. Use a level or string line, especially along the top edge.
Spread the foliage over the seams. Gently pull leaves outward to cover the connecting points.
Trim carefully. Cut through the plastic backing rather than randomly cutting through the decorative foliage.
Hide visible fasteners. Position cable ties and screws behind leaves whenever possible.
Check from different angles. Walk several feet away and inspect the fence from both sides if accessible.
Do not stretch the panels to hide gaps. This can distort the backing and create weak points.
How to Cut Boxwood Panels Around Posts, Gates, and Corners
Most artificial hedge panels use a plastic grid that can be trimmed with suitable scissors or cutting snips.
Before cutting, measure the required opening carefully.
For fence posts:
-
Hold the panel in its intended position.
-
Mark the area that needs to be removed.
-
Move foliage away from the cutting line.
-
Cut through the backing grid carefully.
-
Secure the cut edge with additional compatible fasteners.
For gates, leave enough clearance so the gate can swing freely.
Do not cover hinges, latches, or moving hardware. Also check that the added foliage does not obstruct the gate's operation.
For outside corners, plan how the panels will meet before cutting. A clean, aligned joint generally looks better than forcing two oversized panels together.
Wear gloves when cutting plastic backing. Sharp edges and cutting tools can cause injuries.
How to Keep Artificial Boxwood Privacy Panels Secure in Wind
Artificial hedge panels create a larger surface for wind to push against. The fence itself must carry that added load.
This is particularly important for long chain-link runs, exposed backyards, coastal properties, and locations that regularly experience strong gusts.
Use these practices to improve the installation:
-
Secure the top, bottom, sides, and intermediate areas.
-
Use outdoor-rated fasteners that suit the panel and fence.
-
Add more fixing points where the installation is exposed.
-
Avoid leaving large unsupported sections.
-
Check that the fence posts are firmly anchored.
-
Inspect the panel connections after strong winds.
-
Replace brittle, damaged, or loose fasteners.
Do not assume that a dense panel will automatically withstand high winds because it is made for outdoor use.
If your location experiences severe storms, consult the panel and fence manufacturers about suitability. A decorative screen may need additional structural support, or it may be better to remove it before extreme weather if the installation is not rated for those conditions.
Is the VEVOR Artificial Boxwood Panel Set Right for Your Privacy Fence?
The VEVOR Artificial Boxwood Panel 48-Piece Set is designed for decorative greenery across walls, fences, garden areas, and indoor or outdoor backdrops.
The product title identifies several features worth considering:
-
48 artificial boxwood panels.
-
UV-related outdoor-use positioning.
-
Green decorative foliage.
-
10 × 10 dimensions stated in the listing title.
-
4 cm thickness stated in the listing title.
-
Intended use for decorative walls and privacy fencing.
The panel format can be useful when you want to cover a section of fence in smaller, manageable pieces rather than installing one long roll.
Before buying, verify the actual panel dimensions, total coverage, backing-grid construction, connector design, and included installation accessories.
Also check whether the product instructions specify cable ties, staples, screws, or another mounting method for your fence type.
For a chain-link fence, compatible UV-resistant cable ties are a practical installation option when approved for the panel. For a wooden fence, suitable staples or screws may be appropriate depending on the backing and timber.
The most important point is to match the installation method to the actual product instructions rather than assuming every artificial hedge panel uses identical connectors.
Common Installation Mistakes to Avoid
Even a straightforward DIY project can look untidy or become unreliable when a few details are overlooked.
Using indoor cable ties outdoors: Sunlight can weaken ordinary plastic ties. Choose outdoor-rated, UV-resistant options.
Securing only the corners: Unsupported sections may lift, flap, or separate in windy conditions.
Attaching panels to a weak fence: The fence must be stable enough to carry the added screen.
Stapling through the leaves: Fasteners should pass through the plastic backing grid, not the decorative foliage.
Pulling panels too tightly: Excess tension can distort the backing and make the seams look uneven.
Ignoring gates and hinges: Leave enough clearance for moving sections.
Buying without measuring: Count the actual coverage area, not just the number of panels in the package.
Skipping maintenance: Outdoor fasteners and fence connections need occasional inspection.
Artificial Boxwood Fence Installation Checklist
Before calling the project finished, run through this list:
-
Fence measurements checked.
-
Panel quantity and coverage confirmed.
-
Fence posts and rails inspected.
-
Loose or damaged fence sections repaired.
-
Correct outdoor fasteners selected.
-
Panel connectors properly engaged.
-
Top edge installed straight.
-
Panel corners and intermediate areas secured.
-
Cut edges fastened neatly.
-
Gate movement checked.
-
Visible gaps and seams adjusted.
-
Fasteners checked for excessive tension.
-
Installation inspected from both sides where accessible.
Frequently Asked Questions
Can artificial boxwood panels be installed directly on a chain-link fence?
Yes. Compatible panels can often attach directly to chain-link using UV-resistant cable ties threaded through the plastic backing grid and around the fence mesh.
Can I staple artificial hedge panels to a wooden fence?
Yes, if the panel backing and timber are suitable for stapling. Use compatible outdoor-rated staples and secure the plastic grid rather than the decorative leaves.
How many cable ties do I need per panel?
It depends on the panel size, backing design, fence condition, and wind exposure. Follow the product instructions. Add appropriate intermediate fixing points rather than relying only on the corners.
Do artificial boxwood panels provide complete privacy?
Not necessarily. Privacy depends on foliage density, panel construction, seams, and viewing angle. Check the actual panel before buying if you need a solid visual screen.
Can artificial boxwood panels be cut to fit?
Most grid-backed panels can be trimmed with suitable scissors or snips. Cut the plastic backing carefully and secure the cut edges after installation.
Will artificial boxwood panels fade outdoors?
UV-treated panels are designed to resist sunlight-related deterioration, but performance varies by product and exposure. Check the manufacturer's UV information and warranty rather than assuming the color will remain unchanged indefinitely.
Can artificial hedge panels damage a fence in strong wind?
They can contribute to additional wind loading. If the fence is weak or the panels are poorly secured, movement may loosen fasteners or damage the fence. Inspect the structure and use an installation method suitable for local conditions.
Turn a Plain Fence Into a Greener, More Private Space
Artificial boxwood panels can make a noticeable difference to a backyard, patio, or garden fence without the waiting and maintenance involved in growing a natural hedge.
The secret to a successful installation is preparation. Measure the fence, inspect its condition, connect the panels neatly, and use fasteners designed for the surface and outdoor exposure.
For chain-link fencing, UV-resistant cable ties provide a convenient way to secure the backing grid. For wooden fences, compatible outdoor staples or screws can create a clean attachment.
If you're planning a green privacy screen, explore the VEVOR 48-piece artificial boxwood panel set. Confirm the panel coverage and mounting details before ordering, then choose the right fixing system for your fence.
A little measuring and careful fastening can turn an exposed fence into a much greener backdrop for outdoor meals, quiet afternoons, and backyard gatherings.